This provides instructions of how to collect SEC-SAXS data at the BioCAT beamline. Before comming, please ensure that you’ve read up on how to plan your experiment and that you’ve properly prepared your samples.
Contents
Before data collection
There are a few common processes:
- Every buffer you use for SEC-SAXS should be filtered and degassed.
- In SEC-SAXS experiments you should reserve ~50 mL of buffer in a falcon tube. This will be used for cleaning the sample loop, diluting samples, etc. It is convenient to not have to extract this from the larger buffer bottles.
- Every sample should be spun down for 10 minutes just before measurement.
Changing buffer
To change buffer you must do two things. First, you need to equilibrate the column in the new buffer. Second, you need to change the coflow buffer.
IMPORTANT: Never change directly from a buffer with salt to a storage solution of 20% ethanol, or vice versa. This could cause salt to crash out of solution and damage equipment. Always include a water equilibration step between those types of solutions.
Changing buffer on the AKTA
IMPORTANT: A beamline scientist should train you on how to change buffer before you do it on your own.
SEC-SAXS uses the BioCAT AKTA Pure FPLC, which is controlled by UNICORN 6. To change buffer you need to equilibrate the column you will use. To do so:
In the UNICORN 6 control software, stop any ongoing run by clicking the stop button.
Uncap the new buffer bottle. Remove the A and B frits from the current buffer. Over a waste beaker, rinse both frits and tubing with water from a DI Water squirt bottle.
- IMPORTANT: You may be using the same buffer bottle for the FPLC as the coflow sheath. If so, make sure to stop the FPLC before transferring the FPLC leads with the coflow leads.
Place A and B frits into the new buffer. If necessary, cut and stretch a piece of parafilm over the bottle top to prevent contaminants such as dust entering the bottle. Cap the old buffer bottle.
If it is not open, open the manual instructions window by selecting the Manual->Execute Manual Instructions menu option.
Run a pump wash.
- In the instructions panel of the Manual instructions window, expand pumps and click on “Pump A wash”.
- In the Parameters section select inlet A1.
- In the instruction execution section click Insert.
- Do the same except for Pump B, selecting inlet B1.
- Click the Execute button to start a pump wash.
Set the column position.
- Expand the Flow path section and click on “Column position”.
- Select the appropriate position for your column (you can trace tubing from the column valve). If you’re unsure, ask a beamline scientist.
- Make sure flow direction is downflow and click Execute.
Set a pressure alarm. Just below the column pressure limit, usually 2.8 MPa.
- Expand the Alarms section and click on “Alarm delta column pressure”.
- Set mode to Enabled.
- Set high alarm to just below the column pressure limit. For the GE increase columns set the alarm to 2.8 MPa. For the GE non-increase columns set the alarm to 1.4 MPa.
- Click Execute.
Start flow. Flow rate usually 0.7 mL/min
- In the Pumps section, flick on System flow. Enter the flow rate, usually 0.7 mL/min.
- Click Execute.
Equilibration is now running. You should equilibrate for 2 column volumns. Check periodically to verify that the high alarm has not tripped. If this happens you need to adjust the flow rate down to reduce the pressure. This should only be an issue if buffers have a high concentration of glycerol, if it occurs otherwise it may indicate a problem with the column. In that case contact a beamline scientist.
You will also need to change the coflow sheath buffer.
Changing coflow sheath buffer
IMPORTANT: A beamline scientist should train you on how to change buffer before you do it on your own.
Whenever the buffer is changed for a SEC-SAXS or SEC-MALS-SAXS experiment the coflow sheath buffer also need to be changed. To do so:
- In the experiment control software, stop the coflow by clicking the “Stop Coflow” button.
- Uncap the new buffer. Remove the coflow buffer tubing from the current buffer.
- Remove the pierced cap from the current buffer and place it on the new buffer.
If there are any drops of the old buffer on it, gently with the cap with a kimwipe.
- IMPORTANT: You may be using the same buffer bottle for the FPLC as the coflow sheath. If so, make sure to stop the FPLC before transferring the FPLC leads with the coflow leads.
- Over a waste beaker, rinse the tubing with water from a DI Water squirt bottle.
- Place the coflow buffer line in the new buffer.
- In the experiment control software, start the coflow by clicking the “Start Coflow” button.
The coflow sheath flow should be given ~10 minutes to equilibrate. If you are low on buffer or doing a SEC-MALS-SAXS equilibration you can can then stop the sheath flow while the rest of the system equilibrates. If you are doing a SEC-SAXS equilibration and have plenty of buffer, BioCAT recommends leaving the sheath flow running so that you can’t forget to start it for your experiment.
Loading Sample
IMPORTANT: A beamline scientist should train you on how to load sample before you do it on your own.
Immediately before loading a sample you should spin down the sample for 10 minutes.
To load sample:
In the UNICORN 6 control software, stop any ongoing run by clicking the stop button.
If it is not open, open the manual instructions window by selecting the Manual->Execute Manual Instructions menu option.
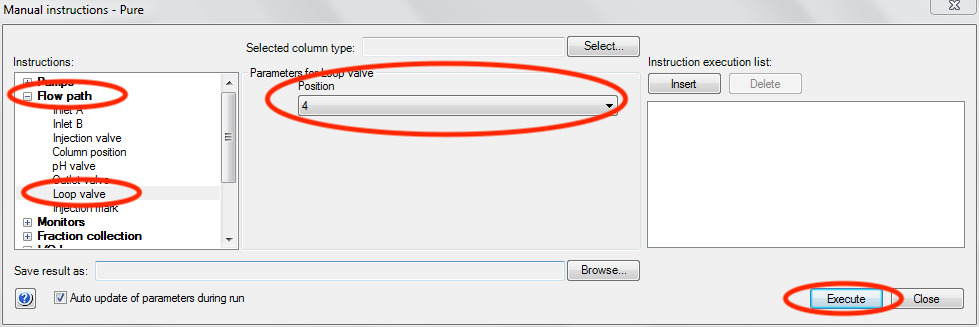
Set the loop valve position.
- In the instructions panel of the Manual instructions window, expand “Flow path” and click on “Loop valve”.
- In the Parameters section select the appropriate position. You can verify the position by looking at the loop valve on the AKTA. If you’re unsure of the position ask as beamline scientist.
- Click Execute.
- WARNING: If you select the wrong loop, or leave the valve in bypass, your sample could be lost! If you have any question about this ask a beamline scientist.
Set the injection valve position.
- In the “Flow path” section select “Injection valve”.
- Set the position to “Manual Load”.
- Click Execute.
- WARNING: If you select the wrong injection valve position, your sample could be lost! If you have any question about this ask a beamline scientist.
Flush the loop. Use a total of 5x loop volume when changing buffers, 2x loop volume between samples in the same buffer.
- Fill a syringe with buffer to more than the selected loop’s volume. Remove the needle used for filling (if any).
- Put the syringe in the load port on the AKTA.
- Empty the entire syringe volume through the loop.
- Repeat once for a new sample in the same buffer. Repeat 5 times if you are changing buffers.
- IMPORTANT: Leave the syringe in the load port after the final flush
- If you want to clean the loop, rather than just flush, talk to a beamline scientist. For most samples this is not necessary.
Load the sample.
- Fill a syringe with the sample loading volume. Remove the needle used for filling (if any).
- Invert the syringe (tip up) and tap to drive any air bubbles to the top.
- With the syringe inverted, push the plunger until the sample is all the way to the tip leaving no air in the syringe.
- Remove the empty buffer syringe from the load port and immediately place the sample syringe in the port.
- IMPORTANT: If you wait after removing the buffer syringe, some volume may siphon out of the loop, letting air enter the system.
- Empty the syringe into the loop.
- IMPORTANT: Leave the syringe in the load port.
Set up data collection
Setting a method for the AKTA
IMPORTANT: A beamline scientist should train you on how to set up an AKTA method before you do it on your own.
To set up a method for a run:
In the UNICORN 6 control software, stop any ongoing run by clicking the stop button.
If available, click the “Run” button.
If the run button is grayed out, click the ‘Open Method Navigator’ button. Then double click the sup2005150 method.
A “Start Protocol” window will open. We will only refer to items within that window going forward.
In the variable list check and change as appropriate:
- Column type
- Column position
- Flow rate (default 0.7 ml/min for 10/300 increase columns)
- Loop position (NOT Sample Loop Position)
- Empty loop with (should be at least 2 loop volumes)
- Isocratic elution length (should be 1.5)
- If you aren’t sure what any of these variables should be, contact your beamline scientist.
- Note that you may have to scroll down in the list to find some of these variables.
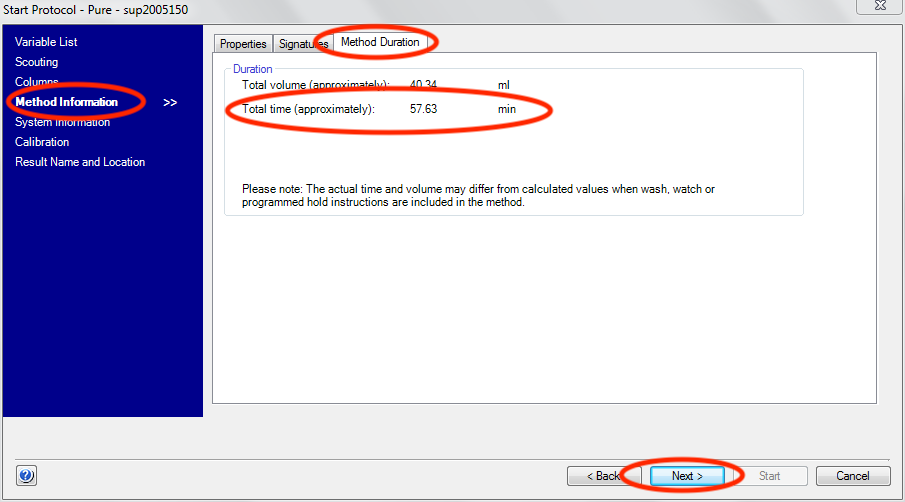
Click the “Next” button three times to advance to the “Method Information” screen. In the “Method Duration” tab take note of the total time.
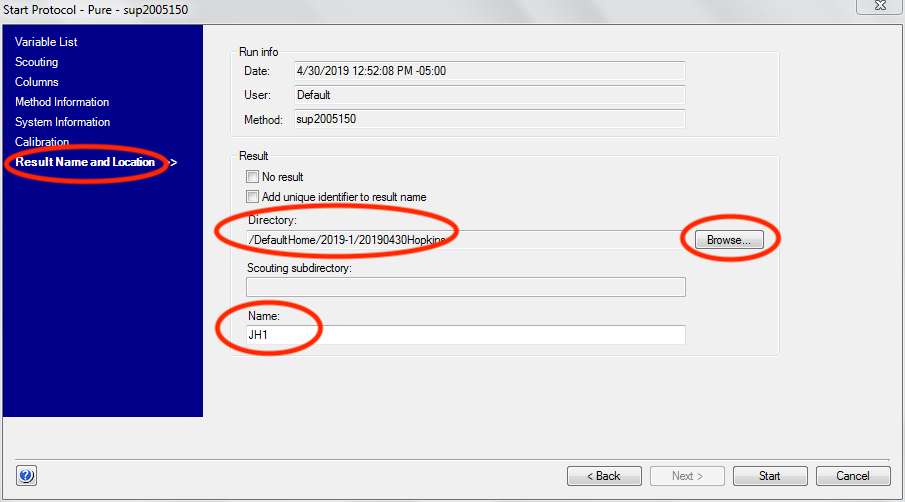
Click the “Next” button three times to advance to the “Result Name and Location” screen.
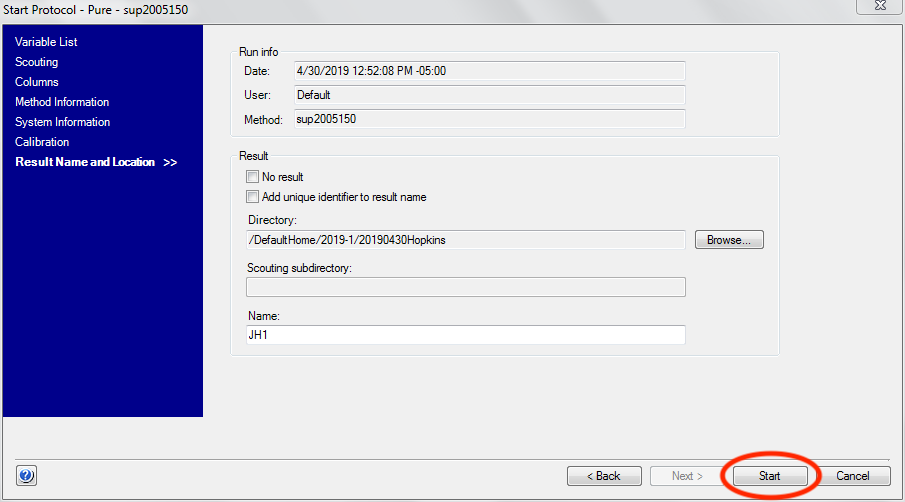
Select the appropriate directory (should be /DefaultHome/<run>/<user>, such as /DefaultHome/2019-1/20190430Hopkins for the first run of 2019, and a user group with PI Hopkins on 04/30/2019). The first time you run a method you will have to create this folder.
Give the run a identifiable name. The BioCAT default is PI initials plus sample number (starting at 1 and incrementing with each sample, for example JH1 for the first sample of a group with PI with initials JH).
You are now ready to start the method. You shouldn’t start it until you’ve closed the hutch and set the proper exposure parameters, so leave the “Start Protocol” window open for now.
Setting exposure parameters
IMPORTANT: A beamline scientist should train you on how to set exposure parameters before you do it on your own.
To set exposure parameters in the BioCAT control software:
Make a new folder for your sample by clicking on the folder button. It will be contained within your top level directory (should match all other top level directory names, such as 2019043_Hopkins for a user group with PI Hopkins on 04/30/2019). Name the folder consistent with the sample identification in the FPLC/HPLC method.
- The BioCAT default for a sample name is PI initials plus sample number (starting at 1 and incrementing with each sample, for example JH1 for the first sample of a group with PI with initials JH).

Change the filename to the new sample name. This should be consistent with the folder name and with the sample identification in the FPLC/HPLC methods.
- The BioCAT default for a sample name is PI initials plus sample number (starting at 1 and incrementing with each sample, for example JH1 for the first sample of a group with PI with initials JH).
Set the exposure time and exposure period appropriately. The defaults that most users will want to use are 0.5 s and 1 s for time and period respectively.
- Note: You will usually not need to change this. Check anyways just to to be sure.
Set the number of frames appropriately. The default most users will want to use is 3600. verify that frames*exposure period is equal to or greater than the run time of your FPLC/HPLC method.

Set the “LC Flow Rate” to the flow rate of your method. If coflow is on click the “Change Flow Rate” button.
- Note: You will usually not need to change this.

If coflow is off click the “Start Coflow” button.

If you’re not sure what any of the above parameters should be, contact your beamline scientist.
Your exposure parameters are now set. You’re ready to start your data collection.
Start data collection
Starting data collection is now simple.
- First start the AKTA method by clicking the “Start” button in the “Start
- Protocol” window.

Then wait until a predetermined time and click the “Start Exposure” button. How long you wait depends on the column you are using, but generally speaking you should start the exposure just after the sample is injected. Talk to your beamline scientist for more guidance with your particular experiment.

At this point you should also start on-line processing of the SAXS data.
Monitor the progress of the elution and the SAXS data to ensure nothing unexpected occurs during your run.
End data collection
The data collection will naturally end when your FPLC method ends and when your exposures end. If you are certain that you have collected all of the data (i.e. everything of interest has eluted and passed through the SAXS cell and the SAXS intensity has returned to baseline) you can end your data collection early. To do this, press the “Stop Exposure” button in the exposure control software.

If everything has eluted from the injection (including any salt or other small molecules) you can also stop the FPLC method. Only do this if you are certain that everything has eluted, otherwise let it run the full 1-1.5 CV.
To do so press the “Stop” button the AKTA control software.

Optimizing your time
There are several things to keep in mind to help you optimize your time:
- Buffer changes on either instrument, but particularly the SEC-MALS-SAXS, take a lot of time. Optimize by combining samples into the same buffer as much as possible. Also make sure you know what experiments you’re doing in which buffer and do them all at once so you don’t have to re-equilibrate.
- If you are doing both SEC-SAXS and SEC-MALS-SAXS, you can do one or the other
while equilibrating the other system. A typical sequence might be:
- Equilibrate one or both of the SEC-MALS-SAXS systems overnight.
- In the morning at the start of your beamtime start to equilibrate the SEC-SAXS system.
- Collect data on one or both of the SEC-MALS-SAXS systems.
- Start those systems equilibrating.
- Switch to the SEC-SAXS system and run samples.
- Switch back to the SEC-MALS-SAXS systems.
- Groups with a lot of buffer changes can pre-equilibrate columns off-line on our preparative FPLC while running experiments on the AKTA.
- You should start spinning down your next sample with ~10-15 minutes left in your current run. This means starting to prepare any dilutions necessary as soon as you’ve started data collection on your current sample.
- If you’re sure all of the injection, including small molecules has eluted, you can stop your data collection early. Many users are able to stop data collection after 1 CV, and don’t need the entire 1.5 CV elution to clear the column.
- If you are using the SEC-MALS-SAXS instrument, once you have stopped the SAXS data collection you can load your next sample into the autosampler without waiting for the HPLC run to finish.


